Get Your Raspberry Pi Working
![]()
Please read this carefully as Donkey Car is now installed differently depending on the version. The latest Donkey Car version is 5.1 and requires 64-bit Raspberry Pi OS Bookworm. Only in case you are using 5.0 you would install 64-bit Bullseye.
If you're using an older version of Donkey Car, sucbh as 4.X, then you need to use the older Raspberry Pi OS (Raspian) version called Buster. Jump to those instructions here.
Tub data, car templates, etc are compatible between the two versions as well
as models in keras format .h5. However, Tensorflow Lite models .tflite
are not and need to be regenerated.
In general, we recommend the RPi 4 or 5 with 4GB of ram. It's also recommended using a 128GB microSD card with U3 speed, like for example this SanDisk SD Card.
Installation for latest Donkey Car (>= 5.1) using Raspberry Pi OS Bookworm
This installation is using Raspberry Pi OS Bookworm (64 bit).
- Step 1: Install Operating System
- Step 2: Update and Upgrade
- Step 3: Raspi-config
- Step 4: Setup Virtual Environment
- Step 5: Install Donkeycar Python Code
- Then Create your Donkeycar Application
Step 1: Install Raspberry Pi OS
Raspberry Pi OS can be installed with the graphical installer Raspberry Pi Imager which can be downloaded from here.
Please download and start the application, with the SD card you'll be using for your RaspberryPi inserted into your computer's SD card reader.
First choose the device you'll be using: Raspberry Pi 5 or Raspberry Pi 4
Then click on 'OS' and select 'Raspberry Pi OS (other)' as shown here:

Then, in the list it provides, scroll down and click on "Raspberry Pi OS (Legacy 64-bit)" as shown here

Then click on 'Storage' and select your SD card.
Then click on "Customization". Here you can enter the specifics of your username. password and wifi details. Set a hostname (try 'donkeycar'), desired password, your wifi, region, etc.
Don't forget to enable SSH access:
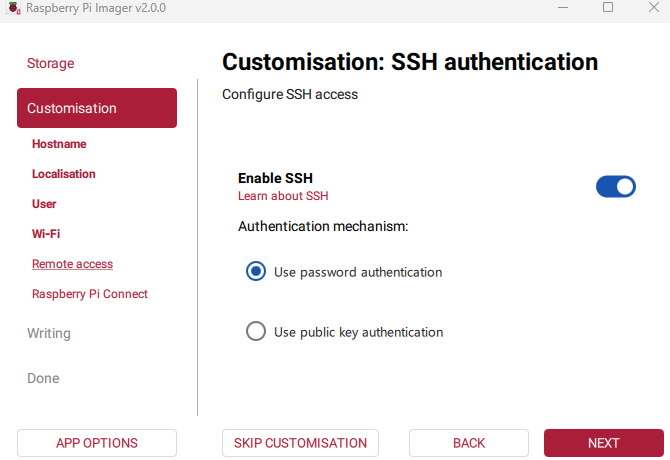
Everything else can be left at the default. When you're done, it will take you to the "Write" stage and will write the OS to your SD card.
When it's done, you can place your SD card in the Pi and power it on. It will take a minute or so to boot the first time, but once it has done so (the green light stops flashing)
You should be able to ssh in to the Pi through your network using the hostname 'donkeycar.local' (or whatever
you chose in the menu) like this: ssh username@hostname.local. So in the above example it would be ssh mydonkey@donkeycar.local .
Step 2: Update and Upgrade
sudo apt-get update --allow-releaseinfo-change
sudo apt-get upgrade
Step 3: Raspi-config
Launch the Raspi config utility:
sudo raspi-config
- Enable
Interfacing Options-I2C - Select
Advanced Options-Expand Filesystemso you can use your whole sd-card storage - Do not enable the legacy camera (it's disabled by default, so don't change anything)
Choose <Finish> and hit enter.
Note: Reboot after changing these settings. Should happen if you select
yes.
Alternatively if you connect to the full desktop using VNC and are running the desktop, go to 'Raspberry -> Preferences -> Raspberry Pi Configuration' and apply the settings there.
Note: If you prefer to install the headless version of Raspberry Pi OS, please follow the steps here. You will need to run
sudo apt -y install pip gitafterwards.
Step 4: Setup virtual environment
To create a virtual environmnet run the following from your home directory:
python3 -m venv env --system-site-packages
echo "source ~/env/bin/activate" >> ~/.bashrc
source ~/.bashrc
Install required libraries
sudo apt install libcap-dev libhdf5-dev libhdf5-serial-dev
Step 5: Install Donkeycar Python Code
User Install (preferred way)
Simply type:
pip install donkeycar[pi]
Note: this will take 5-10 minutes to complete. Be patient!
Developer Install (only required if you want to checkout different forks, branches, tags)
Create a project directory you would like to use as the
head of your projects, change into it and download and install donkeycar
from GitHub. Make sure your donkey env is activated.
mkdir projects
cd projects
git clone https://github.com/autorope/donkeycar
cd donkeycar
git checkout main
pip install -e .[pi]
Further steps
-
Make sure your camera works. Camera connection issues are common, especially after assembly of a new Donkeycar, installation of a new camera or after a crash. In any of those cases or if you otherwise encounter an camera error when using the Donkeycar software, you should make sure your camera is working properly before asking for help on the Discord. Raspberry Pi OS includes Camera Software that will take a picture or stream video. If you have a keyboard, mouse and monitor connected to the Raspberry Pi, then you can run the
rpicam-helloutility to show the camera's video stream. If you are ssh'ing into your Raspberry Pi, then you can take an image and save it as a jpeg using therpicam-jpegutility, then copy the resulting jpeg file to you host computer to view it (generally if it successfully takes the photo without reporting an error then the camera should be ok). -
Make sure tensorflow works. You can validate your tensorflow install by running this command (with the donkey environment activated; if you have completed Step 4 above, then it should be activated). Make sure the version that here is no error. Write down the version that it prints; if you have trouble training a Deep Learning autopilot in later steps then knowing the version of tensorflow that is running is critical to getting help on the Discord.
python -c "import tensorflow; print(tensorflow.__version__)"
Installation for Donkeycar <= 4.5 using Raspberry Pi OS Buster
This installation is using Raspberry Pi OS Buster (32 bit).
- Step 1: Flash Operating System
- Step 2: Setup the WiFi for First Boot
- Step 3: Setup Pi's Hostname
- Step 4: Enable SSH on Boot
- Step 5: Connecting to the Pi
- Step 6: Update and Upgrade
- Step 7: Raspi-config
- Step 8: Install Dependencies
- Step 9: (Optional) Install OpenCV Dependencies
- Step 10: Setup Virtual Env
- Step 11: Install Donkeycar Python Code
- Step 12: (Optional) Install OpenCV
- Step 13: (Optional) Install Mobile App
- Then Create your Donkeycar Application
Step 1: Flash Operating System
Note: If you plan to use the mobile app, consider using the pre-built image. Refer to the mobile app user guide for details.
You need to flash a micro SD image with an operating system.
Note: Raspbian Latest (bullseye) is not compatible with the Python camera bindings. The underlying camera system has changed. Please follow steps below for installing the latest version from the
mainbranch.
- Download Raspian Legacy (Buster).
- Follow OS specific guides here.
- Leave micro SD card in your machine and edit/create some files as below:
Step 2: Setup the WiFi for first boot
We can create a special file which will be used to login to wifi on first boot. More reading here, but we will walk you through it.
On Windows, with your memory card image burned and memory disc still inserted, you should see two drives, which are actually two partitions on the mem disc. One is labeled boot. On Mac and Linux, you should also have access to the _ _boot__ partition of the mem disc. This is formatted with the common FAT type and is where we will edit some files to help it find and log-on to your wifi on its first boot.
Note: If boot is not visible right away, try unplugging and re-inserting the memory card reader.
- Start a text editor
gediton Linux.- Notepad++ on Windows.
- VI on Mac (type
vi /Volumes/boot/wpa_supplicant.confwherebootis the name of the SD Card).
- Possible
countrycodes to use can be found here - Paste and edit this contents to match your wifi, adjust as needed:
country=US
ctrl_interface=DIR=/var/run/wpa_supplicant GROUP=netdev
update_config=1

network={
    ssid="<your network name>"
    psk="<your password>"
}
Note - country defines allowed wifi channels, ensure to set it properly to
your location and hardware.
Replace <your network name> with the ID of your network. Leave the quotes.
I've seen problems when the network name contained an apostrophe, like "Joe's
iPhone".
Replace <your password> with your password, leaving it surrounded by quotes.
If it bothers you to leave your password unencrypted, you may change
the contents later
once you've gotten the pi to boot and log-in.
- Save this file to the root of boot partition with the
filename
wpa_supplicant.conf. On first boot, this file will be moved to/etc/wpa_supplicant/wpa_supplicant.confwhere it may be edited later. If you are using Notepad on Windows, make sure it doesn't have a .txt at the end.
Step 3: Setup Pi's Hostname
Note: This step only possible on a Linux host pc. Otherwise you can set it up later in
raspi-configafter logging in to your pi.
We can also setup the hostname so that your Pi easier to find once on the network. If yours is the only Pi on the network, then you can find it with
ping raspberrypi.local
once it's booted. If there are many other Pi's on the network, then this will
have problems.
If you are on a Linux machine, or are able to edit the UUID partition, then you
can edit the /etc/hostname and /etc/hosts files now to make finding your pi
on the network easier after boot.
Edit those to replace raspberrypi with a name of your choosing.
Use all lower case, no special characters, no hyphens, yes underscores _.
Good idea is to use something like pi-<MAC_ADDRESS> such as pi-deadbeef
especially if you have more pi devices in the same network.
sudo vi /media/userID/UUID/etc/hostname
sudo vi /media/userID/UUID/etc/hosts
Step 4: Enable SSH on Boot
Put a file named ssh in the root of your boot partition. On Mac or Linux
this can be done using the touch command. For example, on the
Mac, touch /Volumes/boot/ssh where boot is the name of the SD card.
Now your SD card is ready. Eject it from your computer - wait until system shows the writing is done and it is safe to remove card. Ensure Pi is turned off, put the card in the Pi and power on the Pi.
Step 5: Connecting to the Pi
If you followed the above instructions to add wifi access, your Pi should now be connected to your wifi network. Now you need to find its IP address so you can connect to it via SSH.
The easiest way (on Ubuntu) is to use the findcar donkey command.
You can try ping raspberrypi.local. If you've modified the hostname, then you
should try:
ping <your hostname>.local
This will fail on a windows machine. Windows users will need the full IP address (unless using cygwin).
If you are having troubles locating your Pi on the network, you will want to plug in an HDMI monitor and USB keyboard into the Pi. Boot it. Login with:
- Username:
pi - Password:
raspberry
Then try the command:
ifconfig wlan0
or just all Ip addresses assigned to the pi (wifi or cable):
ip -br a
If this has a valid IPv4 address, 4 groups of numbers separated by dots, then you can try that with your SSH command. If you don't see anything like that, then your wifi config might have a mistake. You can try to fix with
sudo nano /etc/wpa_supplicant/wpa_supplicant.conf
If you don't have a HDMI monitor and keyboard, you can plug-in the Pi with a CAT5 cable to a router with DHCP. If that router is on the same network as your PC, you can try:
ping raspberrypi.local
Hopefully, one of those methods worked and you are now ready to SSH into your Pi. On Mac and Linux, you can open Terminal. On Windows you can install Putty, one of the alternatives, or on Windows 10 you may have ssh via the command prompt.
If you have a command prompt, you can try:
ssh pi@raspberrypi.local
or
ssh pi@<your pi ip address>
or via Putty.
- Username:
pi - Password:
raspberry - Hostname:
<your pi IP address>
Step 6: Update and Upgrade
sudo apt-get update --allow-releaseinfo-change
sudo apt-get upgrade
Step 7: Raspi-config
sudo raspi-config
- change default password for pi
- change hostname
- enable
Interfacing Options-I2C - enable
Interfacing Options-Camera - select
Advanced Options-Expand Filesystemso you can use your whole sd-card storage
Choose <Finish> and hit enter.
Note: Reboot after changing these settings. Should happen if you select
yes.
Step 8: Install Dependencies
sudo apt-get install build-essential python3 python3-dev python3-pip python3-virtualenv python3-numpy python3-picamera python3-pandas python3-rpi.gpio i2c-tools avahi-utils joystick libopenjp2-7-dev libtiff5-dev gfortran libatlas-base-dev libopenblas-dev libhdf5-serial-dev libgeos-dev git ntp
Step 9: (Optional) Install OpenCV Dependencies
If you are going for a minimal install, you can get by without these. But it can be handy to have OpenCV.
sudo apt-get install libilmbase-dev libopenexr-dev libgstreamer1.0-dev libjasper-dev libwebp-dev libatlas-base-dev libavcodec-dev libavformat-dev libswscale-dev
Step 10: Setup Virtual Env
This needs to be done only once:
python3 -m virtualenv -p python3 env --system-site-packages
echo "source ~/env/bin/activate" >> ~/.bashrc
source ~/.bashrc
Modifying your .bashrc in this way will automatically enable this environment
each time you login. To return to the system python you can type deactivate.
Step 11: Install Donkeycar Python Code
- Create and change to a directory you would like to use as the head of your projects.
mkdir projects
cd projects
- Get the latest stable release (which will be a 4.4 version)
git clone https://github.com/autorope/donkeycar
cd donkeycar
git fetch --all --tags -f
git checkout 4.5.1
pip install -e .[pi]
pip install https://github.com/lhelontra/tensorflow-on-arm/releases/download/v2.2.0/tensorflow-2.2.0-cp37-none-linux_armv7l.whl
You can validate your tensorflow install with
python -c "import tensorflow; print(tensorflow.__version__)"
Step 12: (Optional) Install OpenCV
If you've opted to install the OpenCV dependencies earlier, you can install Python OpenCV bindings now with command:
sudo apt install python3-opencv
If that failed, you can try pip:
pip install opencv-python
Then test to see if import succeeds.
python -c "import cv2"
And if no errors, you have OpenCV installed!
Step 13: (Optional) Install Mobile App
There is a mobile application available on the iPhone and Android that provides an alternative user experience. It can be installed manually or by downloading an SD card image. Follow these instructions to install manually.
Note The server component currently supports RaspberryPi 4B only.